
You learn something new everyday: Log Analytics supports per-table RBAC. I wasn’t aware of that but it was the perfect tool to fulfill a customer request.
Introduction #
Recently I received a customer request that seemed a bit tricky at first: the application team needed specific Entra ID sign-in information that is already logged in Sentinel - but should not be able to access any other data from the SIEM. They wanted to retrieve that data via API to ingest it into another system for reporting purposes.
With conventional resource-level RBAC you are able to grant things like read-only permissions to the whole Log Analytics Workspace. But then the assignee can read all tables. That might not be an issue in some cases, but if Sentinel is enabled, the LAW will certainly contain data that is no one’s business but the security team’s.
If we try to look for different approaches, one alternative presents itself:
Create a new LAW, save only the Entra ID sign-in logs in it using Diagnostic Settings and give the application team read-only permissions.
Now that will work perfectly fine from a technical perspective, but the data is in Sentinel already. This means it’s already paid for. Using an additional LAW means additional costs.
Such costs do of course wildly depend on size and usage. But in our case the SigninLogs table alone would have been thousands of dollars every month.
Furthermore, this solution is - from a technical perspective - just unnecessary resource and configuration bloat.
So, Sentinel it is. But how do we guarantee that only the required data is accessible? Enter per-table RBAC.
The Idea #
In my research (I always find it a little amusing to call planless web searching research, but I guess that’s what it is nowadays) I found out that Log Analytics has table-level RBAC. This means that you can grant permissions on specific tables only.
The feature actually goes deeper, apparently there is row-level RBAC as well, to restrict not only access to certain tables, but also to a set of rows. You could use this to for example anonymize logs by removing access to rows that contain PII (Personally Identifiable Information).
For my use case, this wasn’t needed, but since it’s all in the same UI I will show it as well.
The Setup #
App Registration #
Since we are sending our queries via API, we are using an App Registration.
This is just an App Registration with a secret - using a certificate is recommended as always.
There is no need to configure anything else here, simply create an App Registration for now.
Role Assignment #
Here comes the interesting part:
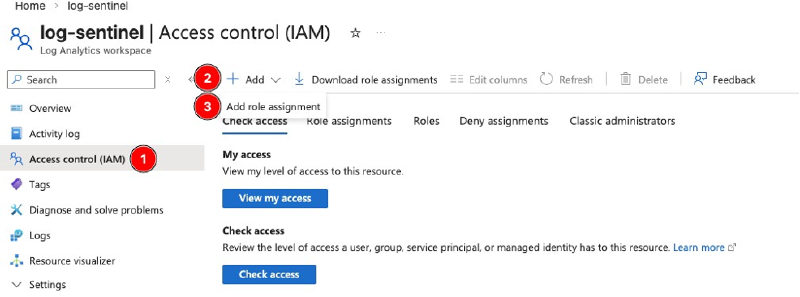
Navigate to your Log Analytics Workspace –> Access Control (IAM) –> Add –> Add role assignment
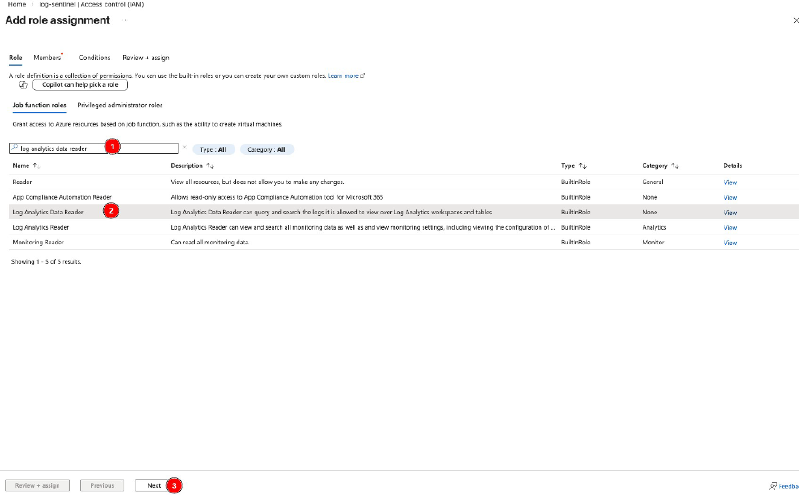
Search for Log Analytics Data Reader, select the role and continue with Next.
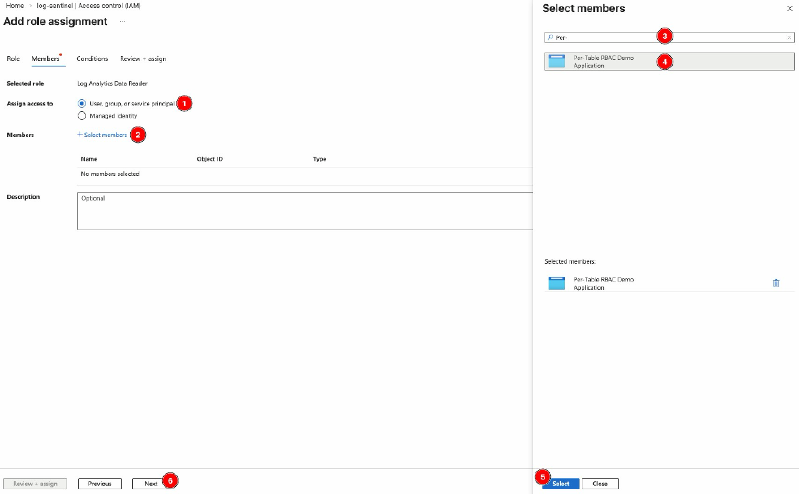
Make sure User, group, or service principal is checked.
Select Select members, search for your App Registration, select it so it shows up under Selected members, choose Select and confirm with Next.
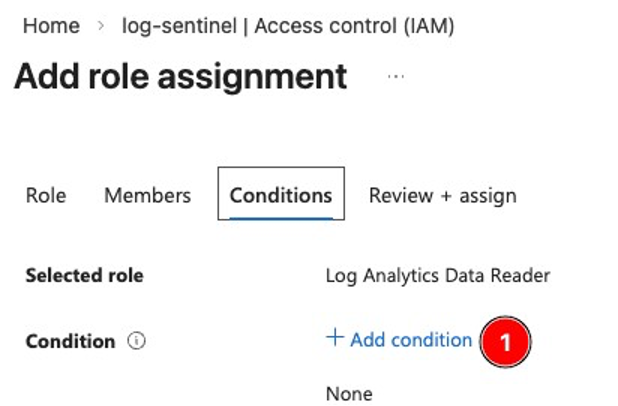
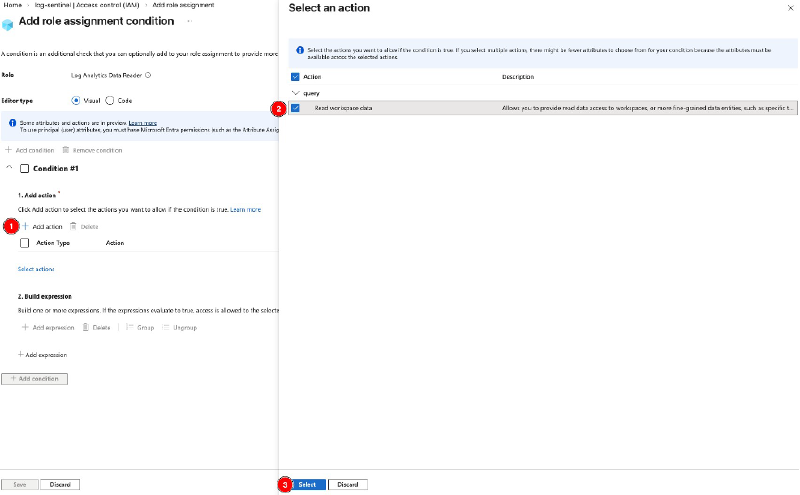
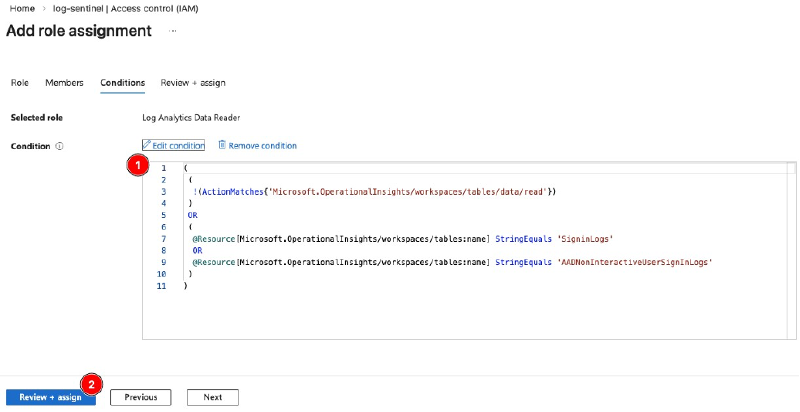
Next, select Add condition to create a granular filter.
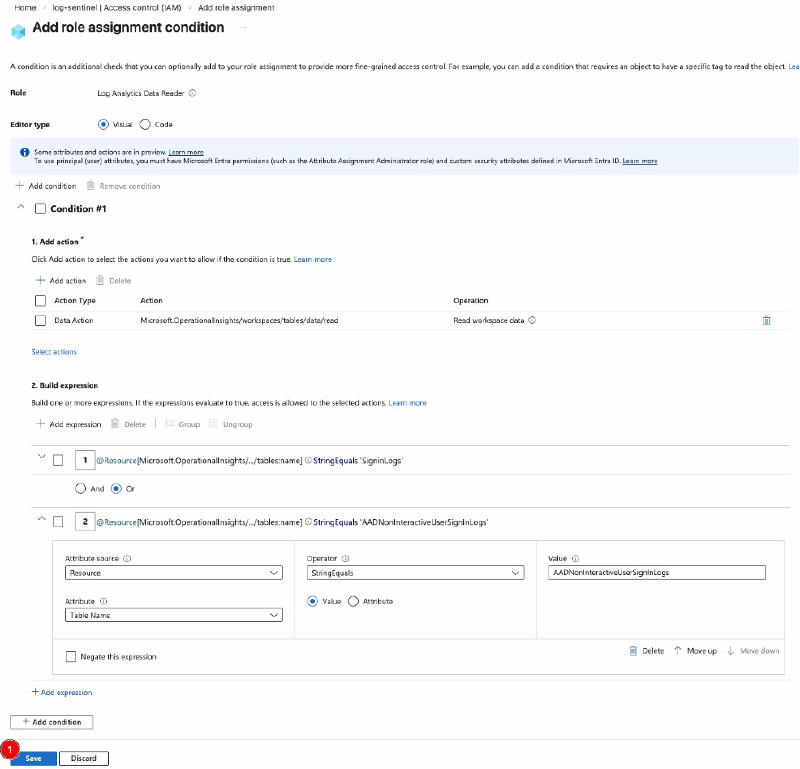
First off, select Add Action under 1. Add action. In the flyout menu, select Read workspace data and confirm with Select. This should be the only available option.
Afterwards, continue to 2. Build expression. Here, again select Add expression.
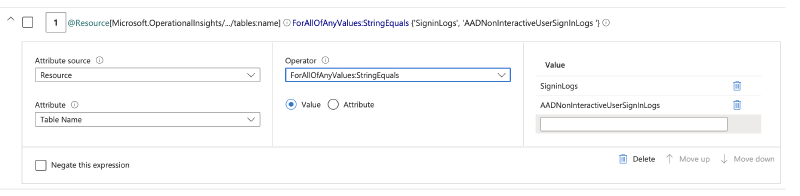
Under Attribute source, select Resource from the dropdown.
Under Attribute, select Table Name.
Under Operator, select StringEquals and make sure Value is checked.
Under Value, enter the table name. In this case, enter SigninLogs.
Make sure to enter the table name correctly!
This includes case-sensitivity.
Best copy the names from the Log Explorer, MS Learn or from this blog post.

You have some options here in addition so adding single tables like I did.
Find all the options in the Operator dropdown:
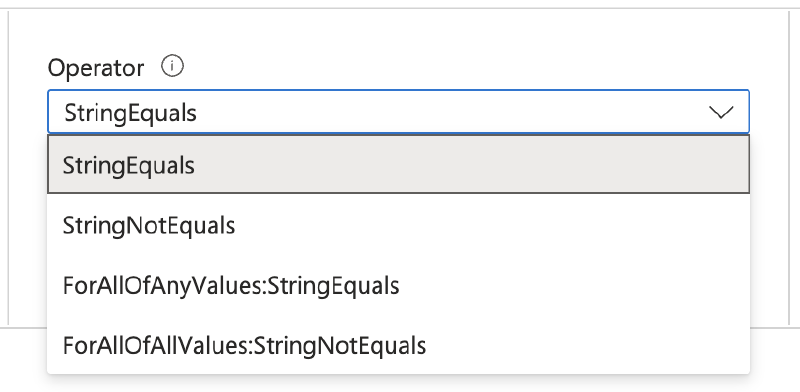
Here you can’t just include tables but also exclude them using StringNotEquals. With this you would allow read access to all tables in the LAW except the one listed.
Then you have ForAllOfAnyValues:StringEquals and ForAllOfAnyValues:StringNotEquals.
These two settings are the multi-value pendants. Use this if you want to include or exclude multiple tables in your role assignment:
StringEquals statements like I did, same effect. Pick what you prefer.)
Next, review the completed form and confirm with Save.
Review the expression displayed as code and continue with Review + assign.
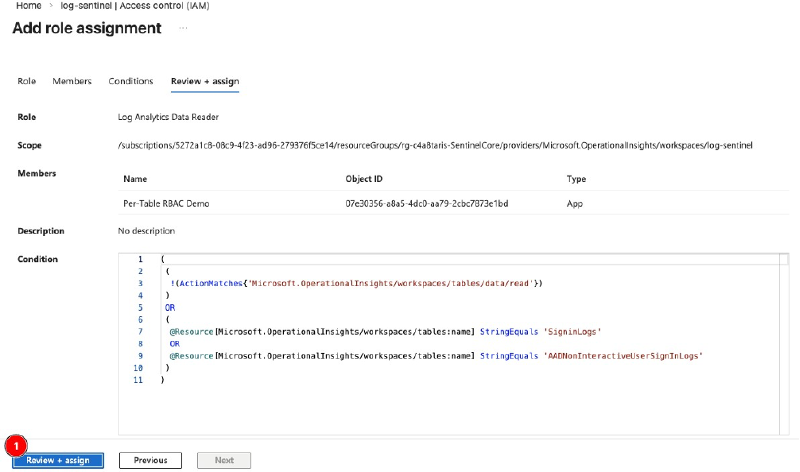
Last, confirm with Review + assign again to save the role assignment.
At this point, the setup is done.
Microsoft notes that assignments can take up to 15 minutes to apply and trust me they do.
Grab a coffee and drink it before starting the last step: testing
Testing and validation #
Let’s test our setup to validate my ramblings.
I already got myself an MS Graph Access Token. If you need some guidance on how to do that, refer to this MS Learn article.
Make sure that you use the following URL as scope in your POST request to get your access token: https://api.loganalytics.io/.default
Since Log Analytics has its own API, you need to use this URL as scope and not the general Graph API scope URL.
So let’s GET some data (wheezes).
The API URL is
|
|
Also here you can find the API reference if you want to see some details.
Replace the variables with value from your tenant. For the KQL query I will simply query SigninLogs since I added that table to my role assignment earlier.
Also Add the following 2 Headers:
Content-Type:application/jsonAuthorization:Bearer [ACCESS TOKEN]
With that all ready, let’s fire our query!
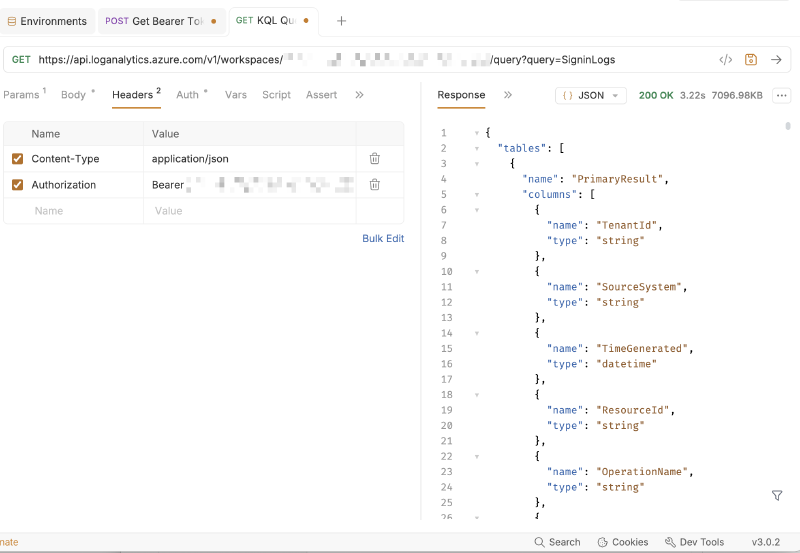
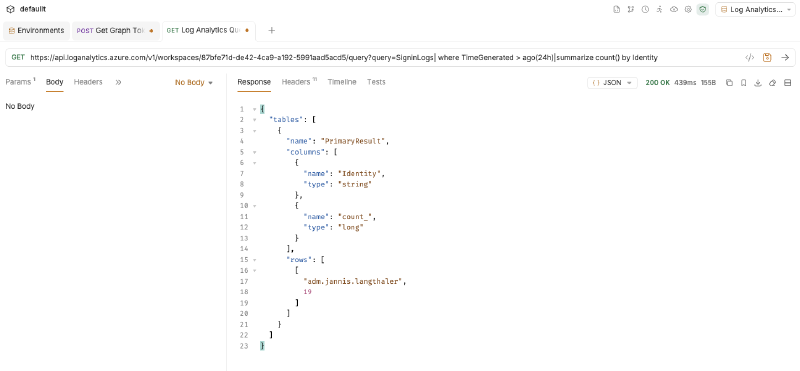
Now you may think the response looks weird at first. The API always returns the table schema first, which is quite handy if you deal with multiple tables. This way you can use your automation logic to deal with different column names dynamically for example.
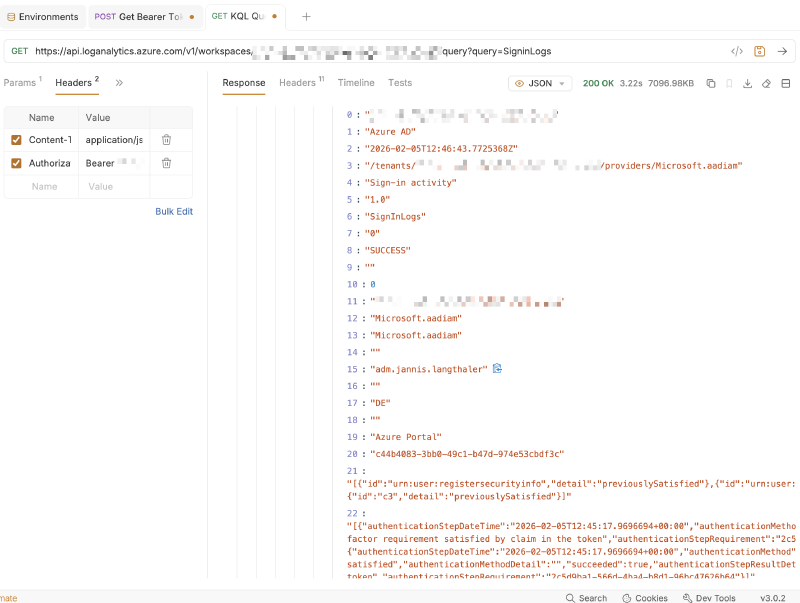
Scroll down a little while and there’s your data:
Additional Options #
As promised in the intro, there is an additional option I didn’t use but want to show you anyway:
The option to further restrict access to only specific columns if they contain a certain string (or strings)!
Let’s take a look:
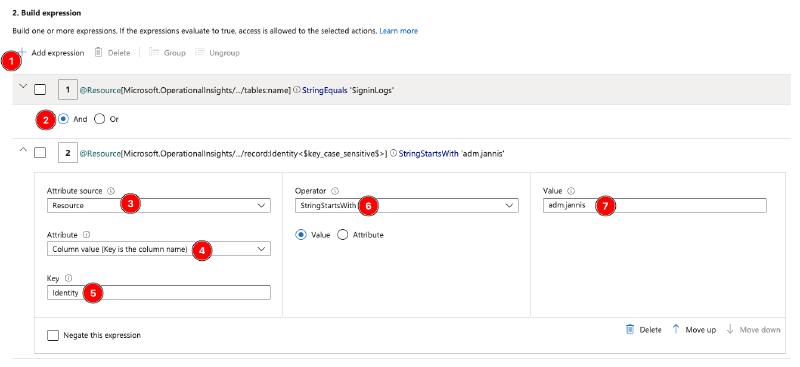
First off after adding a new expression make sure to change the radio button from Or to And (2) to save you some time with troubleshooting (ask me how I know).
In Attribute source select Resource.
Then, in Attribute, select Column value (Key is the column name).
In Key, enter the column name you would like to filter on.
Again, make sure to spell the table correctly, including case-sensitivity.
Next, choose an Operator. There are more options to choose from than in the previous step. I chose StringStartsWith for my setup.
Last, under Value, enter the value you want to filter on.
So in my case, I’m applying a filter on the column Identity for all entries that start with adm.jannis. And as you can see in the upper area of the screenshot I’m already limiting access to only the table SigninLogs.
After saving, it will take some time for the role assignment to take hold, about 15 minutes in my limited testing. So grab another coffee before testing.
Testing and validation #
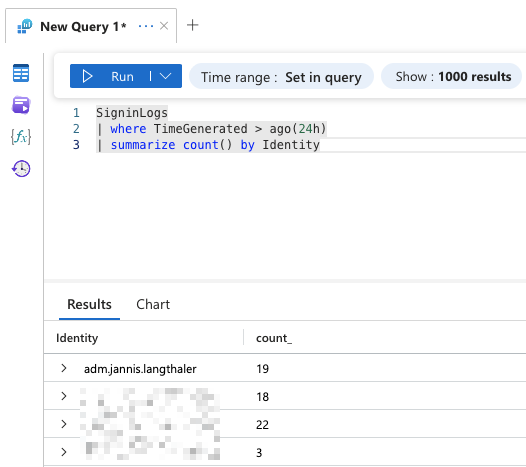
Querying the table with my user shows sign-ins from 4 users:
Running the same query with the App Registration that has the limiting role assignment shows only sign-ins from my user since it’s the only one where Identity starts with adm.jannis:
Outro #
And with the tests successful we’re done!
If you have any use cases to retrieve some data from Log Analytics, use the methods I showed you to grant least-privilege access to tables or even specific data within tables.
The only missing feature is the ability to limit access to certain columns only, especially when we’re talking about tables containing PII. That would be nice.